DIY Furniture Makeovers: Upcycling Old Pieces
Do you have some old furniture lying around that has seen better days? Don’t throw them away just yet! With a little creativity and some DIY magic, you can transform those tired pieces into stunning and unique statement pieces for your home. Upcycling old furniture not only saves you money but also helps reduce waste and gives you the opportunity to unleash your inner designer. In this article, we will explore various DIY furniture makeover ideas that will inspire you to get started on your own upcycling project.
1. Determine Your Style and Vision
Before you start your furniture makeover journey, it’s important to determine the style and vision you want to achieve. Browse through design magazines, websites, and social media platforms for inspiration. Decide if you want a modern, rustic, vintage, or eclectic look. Having a clear vision will guide your choice of colors, materials, and techniques.
2. Prep and Repair
Begin by thoroughly cleaning the old piece of furniture. Remove any dirt, grime, or old paint using soap, water, and gentle scrubbing. If the piece has any damaged or loose parts, fix them before proceeding. Tighten screws, repair loose joints, and replace any broken hardware. A solid foundation is crucial for a successful furniture makeover.
3. Sanding and Priming
Next, sand the surface of the furniture to remove any existing finishes and create a smooth surface for paint or stain. Use sandpaper with different grits, starting with coarse and gradually moving to finer grits. After sanding, wipe away any dust using a damp cloth. Apply a coat of primer to enhance paint adhesion and prevent bleed-through. Allow the primer to dry completely before moving on to the next step.
4. Choosing the Perfect Paint
Paint is a powerful tool when it comes to transforming furniture. Consider the style and color scheme you want to achieve. If you’re aiming for a modern look, choose bold and vibrant colors. For a rustic or vintage vibe, opt for distressed or chalk paint finishes. There are various paint options available, including latex, oil-based, and spray paints. Pick the one that suits your project and follow the manufacturer’s instructions for application.
5. Adding Unique Accents
To make your upcycled furniture truly standout, consider adding unique accents. This could be in the form of stencils, decals, or even hand-painted designs. Use masking tape to create crisp lines and patterns. Transform a plain dresser into an eye-catching piece of art by painting a mandala design on the drawer fronts, for example. Let your creativity flow and experiment with different techniques to personalize your furniture.
6. Reupholstering and Fabric Makeovers
Old chairs, sofas, and ottomans can be given a new lease on life through reupholstering. Choose a fabric that complements the overall aesthetic you’re aiming for. Remove the old fabric, ensuring to save it as a template for cutting the new one. Use a staple gun to attach the new fabric to the furniture frame, pulling it tightly for a professional finish. You can also experiment with fabric paints and dyeing techniques to update the look of upholstered furniture.
7. Restoring Natural Wood Finishes
If you have a piece of furniture with beautiful natural wood, consider restoring its original finish instead of covering it up. Strip away any existing paint or stain using an appropriate wood stripper. Sand the surface to smooth out imperfections and apply a new coat of stain or varnish. This process allows the natural beauty of the wood to shine through while giving it a refreshed look.
8. Adding New Hardware
Swapping out old hardware, such as knobs, handles, and hinges, can instantly update the look of a piece of furniture. Choose hardware that complements your overall design and consider mixing and matching styles for an eclectic touch. Antique brass, modern chrome, or unique handmade pieces can instantly elevate the look of your furniture.
9. Finishing Touches and Sealants
Once you have completed the makeover, don’t forget to add some finishing touches. Consider distressing the edges for a vintage look or adding decorative trims and molding. To protect your newly transformed furniture, apply a sealant or topcoat. This will ensure durability and make it easier to clean and maintain.
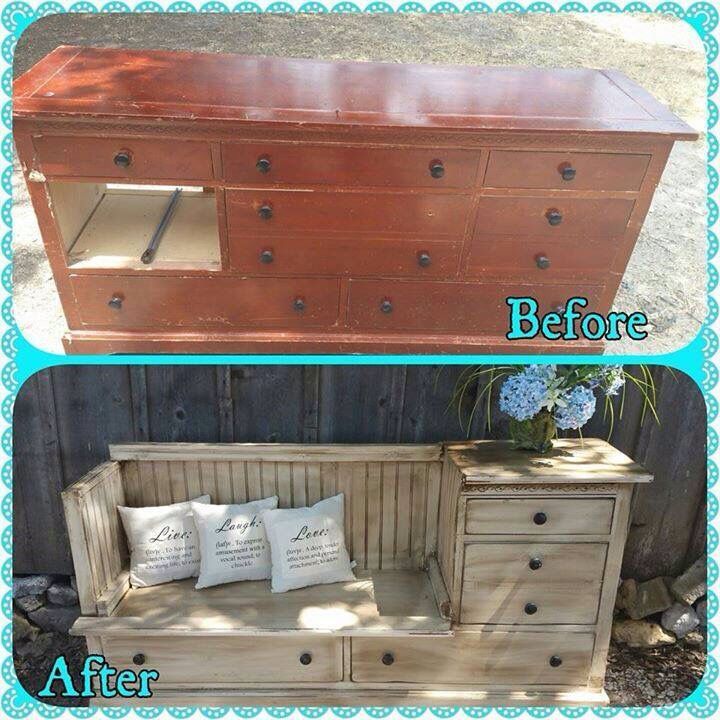
10. Showcasing Your Upcycled Masterpiece
Finally, proudly display your upcycled masterpiece in your home. Whether it’s a transformed dresser, a revamped coffee table, or a reimagined chair, your DIY furniture makeover will be a conversation starter and a unique expression of your personal style. Share your accomplishments with friends and family or even consider selling your upcycled creations for others to enjoy.
Remember, upcycling furniture is not only a creative and eco-friendly endeavor but also a fun and rewarding experience. It allows you to bring new life to old pieces and create one-of-a-kind treasures. So, grab your paintbrush, put on your creative hat, and embark on an exciting journey of DIY furniture makeovers!